How to Create Facebook Ads: Your Detailed Guide (App Growth Blog Series Part 4)

In this article, we stay on the Acquisition stage of the funnel but will switch gears from organic growth channels to paid growth channels. We’ll take a deep dive into Facebook advertising and guide you through a step-by-step approach for how to create and run effective Facebook ads for your app.
Facebook ads are a great way to acquire users in large volumes at an optimal cost. Just think that an estimated 2.26 billion people use Facebook, WhatsApp, Instagram, or Messenger every day and more than 2.89 billion people use at least one of the Facebook family of services every month. So basically, if there’s someone you want to target, you’ll probably find them on a Facebook platform!
Targeting the right audience and being creative with your ads and campaigns are the key to success.
The Facebook Ads Creative Process

1. Build your user persona
The very first thing that needs to be done is to identify three target markets. There is usually one primary market and two secondary markets. You want to build personas for your target markets that go beyond just identifying gender and age range.
How do you build user personas?
- Give your persona a specific name: Mia the Moving Millennial
- Then identify characteristics Mia may have: Does she work or go to school? Where? How old is she? Is she single? What are her favorite shows? Does she have any pets?
- Provide info based on general information that’s relevant to your persona’s target market range. For example, Mia likes to recycle just like 60% of her friends between the ages of 25-33.

2. Base your Facebook Ad concepts on each persona
Brainstorm 4-5 concept ideas/themes for ads that target each of the 3 different audiences. One way to start this process is to focus on the three personas created and evaluate what values the persona/target group have in common.
For example, many millennials are environmentally conscious; so, one theme for your ads can be recycling and being green. After identifying 4-5 themes, discuss with your team to select 2 or 3 themes that best suit your target audience and the product you’re trying to promote.
3. Create Facebook campaigns and ads
These 2-3 themes will become your campaigns. Create around 10 ads for each campaign. The ads should be aesthetically pleasing – make sure there’s a consistent color scheme and that the images used for the ads are high quality and non-generic.
If you choose to include text in your image, make sure that the text doesn’t overwhelm the image and vice versa. Facebook will also notify you once you’ve uploaded your image into Facebook ads if your creatives have too much text. Lastly, your company logo should be clearly visible on all your creatives.
Static image ad example from Venmo:

4. Don’t forget about video
Image ads are generally easier to create and often perform better for reach, i.e.impressions. But 60% of marketers agree that video drives more engagement. Video ads in Facebook have shown up to a 30% increase in conversion and 2-3x higher click-through rate than static ads.
Bottom line: try both! The analytics will tell you which ad format is performing better based on your marketing objectives, so give it a go.
5. A/B test your Facebook ads
Oftentimes, it’s the small details that make the biggest difference. You’d be surprised what a difference something as simple as a word change or an image tweak can make in your ad’s effectiveness. Again, see Venmo’s FB ads as an example:

Same copy, same color scheme with the small icon being the only difference between the 2 separately-run ads. Can we guess which one was run for a female target? These 2 ads likely produced very different results!
You can also test by running the same creative with a different background color or a different description. When you are uploading your creatives, try to create a call to action that’s embedded in the creative. After allowing Facebook to run your ads for a day or two, you’ll be able to clearly distinguish which ads are the winners of the group. From there on, you can pause the ads that did not perform as well and focus on the best performing ads.
Campaign Setup & Structure
Once you’ve established your audience and decided on the creative focus of your Facebook advertising, the next part is to set up campaigns by following the steps outlined in the Facebook dashboard.
Here are a few tips for Facebook campaign setup based on our experience:
1. Check audience overlap
When building your campaigns, Facebook will ask you to select an audience. We recommend building two different audiences – that way you can know which audience performs better. But, it’s important not to have overlaps within your audience. Audience overlap can cause cannibalization and increase your user acquisition cost. Cannibalization within Facebook is when Facebook bids one of your audiences against the other. This results in expensive and ineffective installs and results.
So, how do you check audience overlap? First, you must build your audiences. Next, go to Business Manager and select Audience. After, you will be led to a page that looks like this:

From here on, click on the little box next to your audience name and go to the three dots on the top left side of your screen (image). Click on the three dots and a drop down menu will have the option Show Audience Overlaps. With this, you will be able to see how much overlap your two audiences have and adjust accordingly.

2. Budget your test campaigns
Before you launch your campaign, you must budget your tests so that your cost doesn’t go through the roof. We recommend just testing your campaign with $10 to start. You can invest more later once you’ve identified a few clear winners.
3. Upload your creatives
A tip for a successful Facebook ad launch is to upload your creatives onto the Facebook text tool before creating an actual campaign. This way, you can ensure your ad will be approved ahead of time – which means not wasting any resources going back to fix your ads after all the work has been done.
To access the Facebook text tool, go to:
Ongoing Optimization
It’s important to give the Facebook algorithm enough time to learn. To do this, start with Automatic Placement for your ads and let Facebook tell you what’s working best. Automatic placement allows Facebook to place your ads in locations it thinks will yield the best results. Through data compilation and analysis, Facebook will learn within a week where to best place your ads, and you will be able to see a clear picture of each platform’s performance.
From here you can choose to invest only in the platforms that yield the best results. For example, if Instagram Stories and Facebook produce 90% of your results, you know to invest solely in these two platforms.

So there it is, folks! Your summary of how to create and run Facebook ads to grow your mobile app product. We have a lot more to share regarding user acquisition via paid channels, so stay tuned as our App Growth blog post series continues.
If you’d like a free one-stop resource to all of our App Growth tips right now, download our “How To Grow Your App” e-book here!

Related Articles

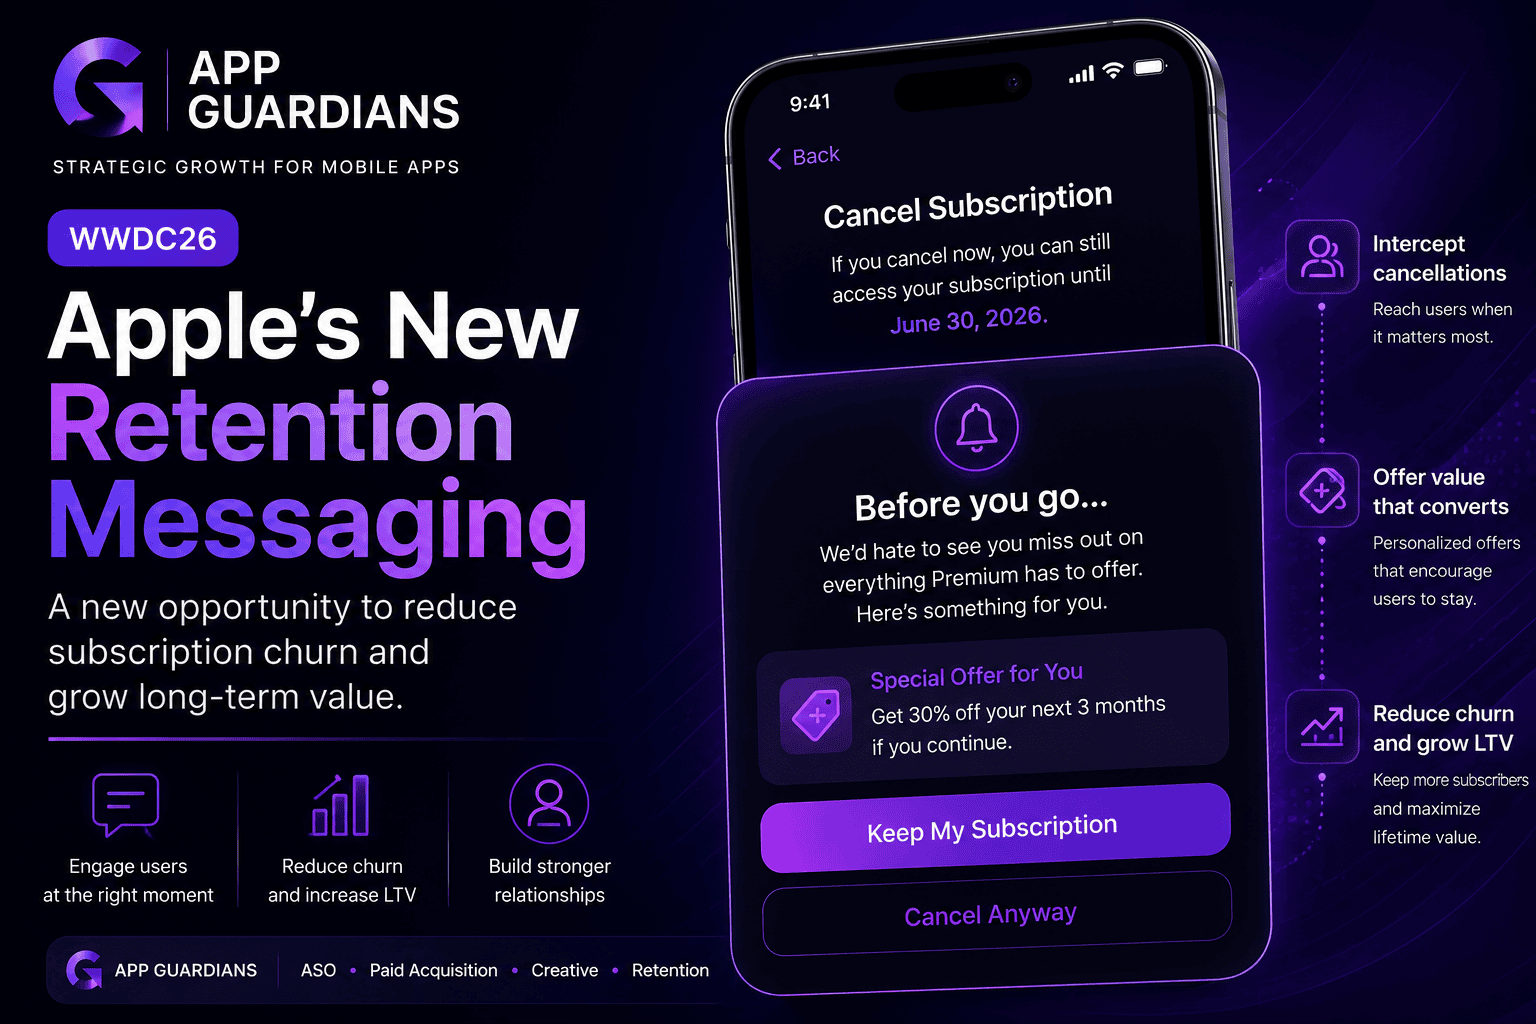
How Apple’s New Retention Messaging Could Help Reduce Subscription Churn When most app teams think about growth, they [...]
-
Summary of what WWDC26 Update Means for Mobile Growth Teams WWDC is often viewed as an event for [...]

In today’s app economy, the “hard paywall or bounce” model is losing its edge. Users are savvier, competition [...]